How to Use Scrcpy: Complete Guide for Windows, Mac & Linux
Most people drop their phone, crack the screen, or just want to use apps on a bigger display — and that’s usually when they go looking for scrcpy. It is a free tool that mirrors your Android phone to your PC. No apps to install on your phone, no root, no paid subscriptions. Just a USB cable and one command.
This guide covers everything — Windows, Mac, Linux, wireless setup, broken screen recovery, and the most common errors people run into in 2026.

Requirements Before You Start
You need 5 things before using scrcpy:
- Android 5.0 or later (API 21+): for basic screen mirroring
- Android 11 or later (API 30+): for audio forwarding
- USB debugging is enabled on your Android phone
- ADB (Android Debug Bridge): bundled on Windows, separate on Mac and Linux
- USB cable for wired setup, or WiFi for wireless setup
How to Use Scrcpy in Windows
- Go to: github.com/Genymobile/scrcpy/releases
- Download: scrcpy-win64-v3.3.4.zip (64-bit) or scrcpy-win32-v3.3.4.zip (32-bit)
- Extract: unzip to any folder, for example C:\scrcpy
- Open: double-click open_a_terminal_here.bat inside the folder
- Run: type scrcpy and press Enter
Tip: Use scrcpy-console.bat instead of scrcpy.exe directly. On error, the terminal stays open so you can read the error message.
Files inside the zip folder:
- scrcpy.exe — the main application
- adb.exe — ADB bundled in, no separate install
- scrcpy-console.bat — runs with terminal window open
- open_a_terminal_here.bat — opens Command Prompt in the folder
How to Use Scrcpy on Android
Nothing installs on your Android phone. It pushes a temporary server file each session, which gets removed automatically when scrcpy closes. Your phone stays clean. The Android side only needs one setup step: USB debugging enabled. After that, every session starts fresh from your PC.
Enable USB Debugging
To enable USB debugging on Android, you must first unlock Developer Options.
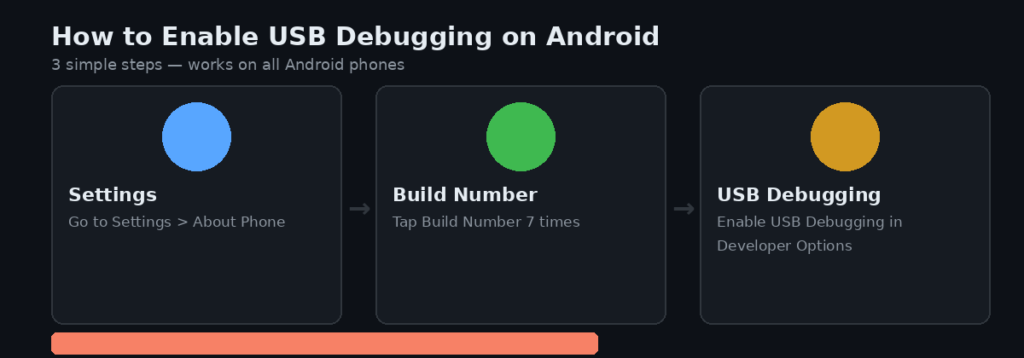
- Step 1 — Open Settings > About phone
- Step 2 — Tap Build number 7 times rapidly until you see: You are now a developer
- Step 3 — Go back to Settings > Developer Options and toggle USB debugging ON
Warning: Xiaomi, Redmi, and POCO phones need one extra step. Go to Settings > Developer Options and also enable USB debugging (Security Settings). Without this, Xiaomi devices show: INJECT_EVENTS permission denied.
Connect and Run
- Connect your USB cable from phone to PC
- On your phone, set USB mode to File Transfer (MTP) — not Charging only
- Tap Allow on the USB debugging popup that appears on your phone
- On your PC, open a terminal and run: scrcpy
Your phone screen opens in a window on your desktop. Use your mouse to click and your keyboard to type.
Note: Verify ADB sees your device first. Run adb devices in the terminal. You should see your device listed as ‘device’. If it shows ‘unauthorized’, tap Allow again on your phone.
How to Use Scrcpy Wirelessly
To use scrcpy wirelessly, both your phone and PC must be on the same WiFi network. Wireless mode uses TCP/IP instead of a USB cable and gives 100 to 200 ms latency on a stable 5 GHz connection.
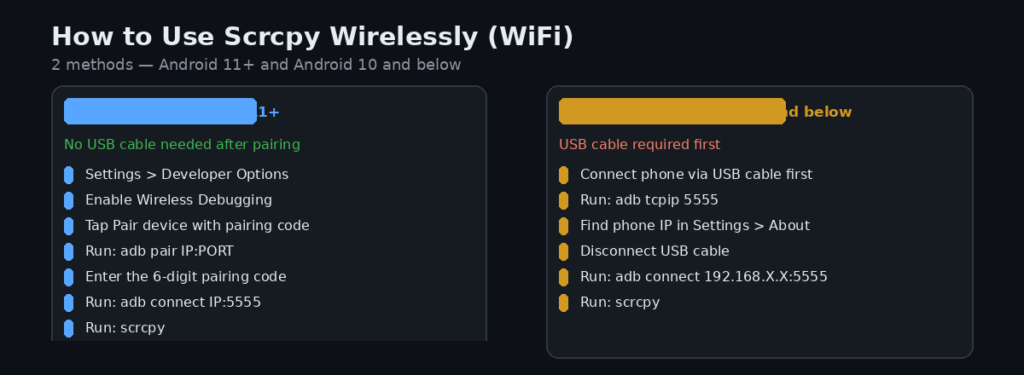
Method 1 — Android 11 and Above (No USB After Pairing)
- 1. Go to Settings > Developer Options > Wireless debugging
- 2. Toggle Wireless debugging ON
- 3. Tap Pair device with pairing code
- 4. Note the IP address, port, and 6-digit pairing code shown on screen
- 5. On your PC, run: adb pair 192.168.X.X:PORT
- 6. Enter the 6-digit pairing code when prompted
- 7. Connect to the device: adb connect 192.168.X.X:5555
- 8. Run scrcpy: scrcpy
Method 2 — Android 10 and Below (USB First)
- 1. Connect phone via USB cable
- 2. Run: adb tcpip 5555
- 3. Find your phone IP: Settings > About phone > Status > IP address
- 4. Disconnect the USB cable
- 5. Run: adb connect 192.168.X.X:5555 Scrcpy
Tip: Force WiFi connection only (when USB and WiFi both connected): scrcpy -e
How to Use Scrcpy With Broken Screen
You can use scrcpy with a broken Android screen — but the approach depends on whether USB debugging was already enabled before the screen broke.
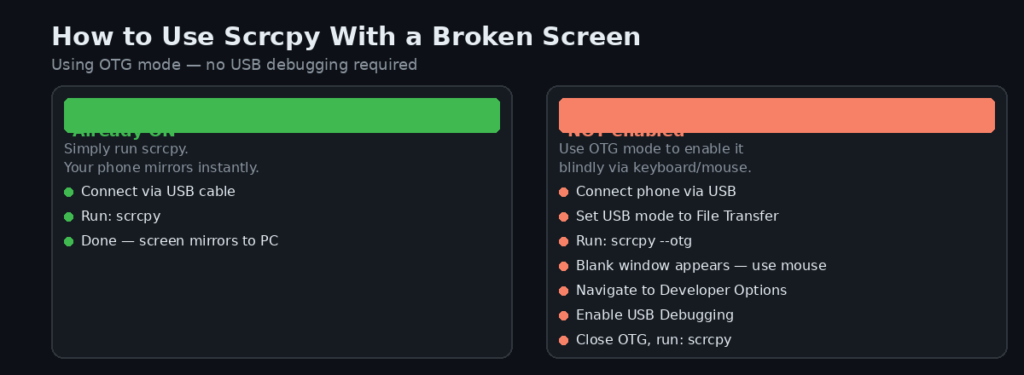
Scenario 1 — USB Debugging Was Already ON (Easy)
If USB debugging was enabled before the screen broke, scrcpy works immediately.
Connect the phone via USB to your PC, run: scrcpy –turn-screen-off
The screen mirrors to your PC. Use your mouse and keyboard to control the phone normally.
Scenario 2 — USB Debugging Was NOT Enabled (OTG Mode)
If USB debugging was never enabled, use OTG mode to enable it blindly using your keyboard and mouse.
- Step 1 — Connect the phone via USB cable
- Step 2 — On the phone, set USB mode to File Transfer (MTP) — pull down notification bar and tap the USB option
- Step 3 — On your PC, run: scrcpy –otg
- Step 4 — A blank window with the scrcpy logo appears — your mouse and keyboard now control the phone
- Step 5 — Navigate to Developer Options using your mouse. Since you cannot see the screen, use Tab and Enter keys to move between options
- Step 6 — Enable USB debugging. A popup asks Allow USB debugging — press Tab, Tab, Enter to confirm
- Step 7 — Close the OTG window. Now run scrcpy normally: scrcpy
Warning: OTG mode shows no screen mirror. You navigate your phone blindly using keyboard and mouse. This is experimental on Windows — works more reliably on Linux.
Navigating Blindly Using Keyboard Shortcuts
When the screen is broken and OTG mode is active, use these key sequences:
- Tab — moves focus between items on screen
- Enter or Space — confirms selection
- Volume Up + Volume Down + Power — force restart (if stuck)
- Tab, Enter, Tab, Tab, Enter — typical sequence to accept USB debugging popup
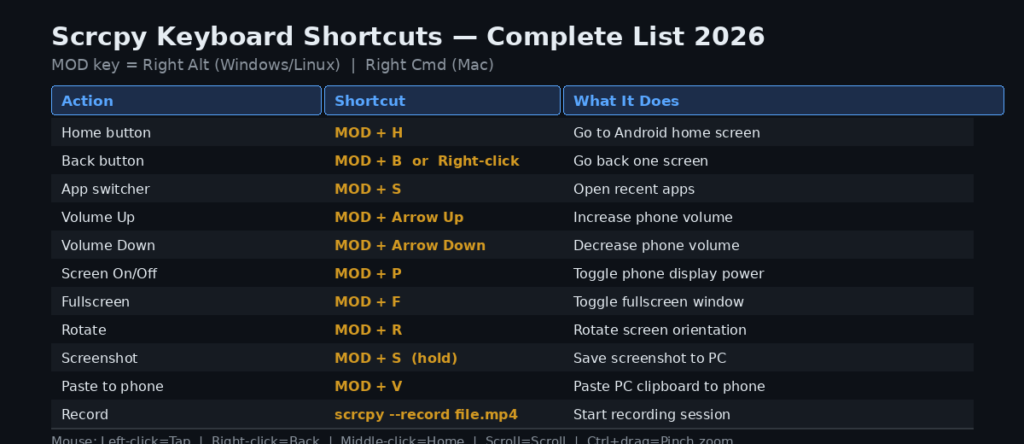
Scrcpy Keyboard Shortcuts and Mouse Controls
The MOD key on Windows and Linux is Right Alt. On Mac, the MOD key is Right Cmd.
| Action | Shortcut |
| Home button | MOD + H or Middle-click |
| Back button | MOD + B or Right-click |
| App switcher | MOD + S |
| Volume Up | MOD + Arrow Up |
| Volume Down | MOD + Arrow Down |
| Screen on/off | MOD + P |
| Fullscreen | MOD + F |
| Rotate | MOD + R |
| Screenshot | MOD + S (hold 1 second) |
| Copy phone to PC | MOD + C |
| Paste PC to phone | MOD + V |
| Expand notifications | MOD + N |
| Collapse notifications | MOD + N + N |
| Resize window 1:1 | MOD + G |
| Close scrcpy | MOD + W |
How to Record Your Android Screen with Scrcpy
To record your Android screen with scrcpy, add the –record flag with a filename to the command.
Basic Recording
scrcpy –record screen.mp4
Record Without Showing Screen on PC
scrcpy –no-playback –record screen.mp4
Record in H.265 (Better Quality, Smaller File)
scrcpy –video-codec=h265 –record screen.mp4
Record at 1080p, 60fps
scrcpy –max-size=1920 –max-fps=60 –record screen.mp4
Record Camera Directly
scrcpy –video-source=camera –video-codec=h265 –camera-size=1920×1080 –record=camera.mp4
Note: Press Ctrl + C to stop recording. The file saves in the folder where you ran the command.
How to Enable Audio Forwarding
Audio forwarding works on Android 11 (API 30) and above only. Android 10 and below do not support audio forwarding through scrcpy.
Forward Audio to PC (Default)
scrcpy : Audio forwards automatically on Android 11+. No extra flag needed.
Play Audio on Both Phone and PC
scrcpy –audio-dup
Use Phone Microphone as Audio Source
scrcpy –audio-source=mic
Disable Audio Completely
scrcpy –no-audio
Warning: Some streaming apps (YouTube, Spotify) block audio capture by design. Try –audio-source=playback as an alternative.
How to Mirror Camera as Webcam
To use your Android camera as a webcam on Linux, run scrcpy with the –v4l2-sink flag. This feature is Linux-only. Windows users can route scrcpy output through OBS Virtual Camera.
Load V4L2 Loopback Driver First
sudo modprobe v4l2loopback
Mirror Front Camera as Virtual Webcam
scrcpy –video-source=camera –camera-facing=front –v4l2-sink=/dev/video2 –no-playback
Mirror Rear Camera at 1080p
scrcpy –video-source=camera –video-codec=h265 –camera-size=1920×1080 –v4l2-sink=/dev/video2 –no-playback
Note: After running the command, open Zoom, Google Meet, or OBS. Select the virtual camera — usually listed as /dev/video2 or Dummy video device.
Common Scrcpy Errors and Fixes
These are the 8 most common scrcpy errors in 2026 with exact fixes.
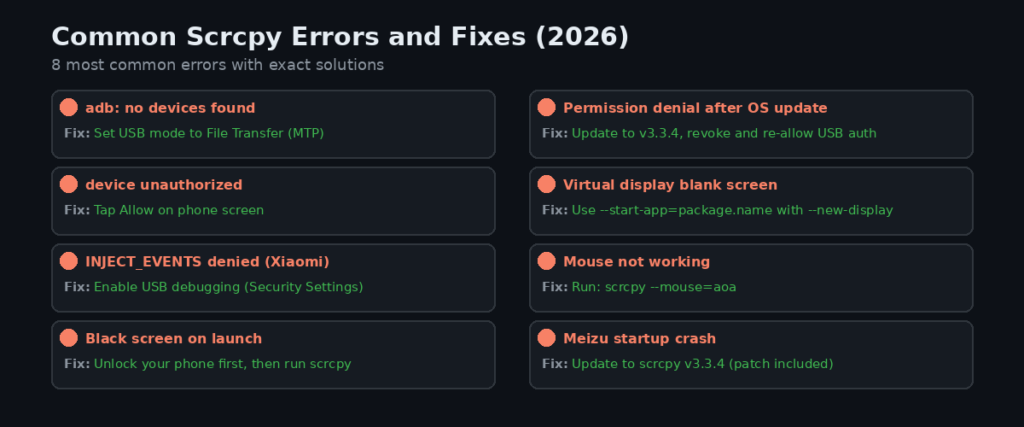
1. adb: no devices/emulators found
- Cause: USB not recognized or wrong USB mode.
- Fix: Set USB mode to File Transfer (MTP) on your phone — not Charging only.
2. device unauthorized
- Cause: USB debugging permission not granted.
- Fix: Look at your phone screen and tap Allow on the USB debugging popup.
3. INJECT_EVENTS permission denied (Xiaomi / MIUI / HyperOS)
- Cause: Missing secondary security permission.
- Fix: Settings > Developer Options > USB debugging (Security Settings) — enable this second toggle.
4. Black screen after scrcpy launches
- Cause: Phone screen is locked.
- Fix: Unlock your phone first, then run scrcpy again.
5. Permission denial error after Android OS upgrade
Cause: Android updates reset ADB permissions. Fixed in v3.3.4.
- Update to scrcpy v3.3.4
- Go to Settings > Developer Options
- Tap Revoke USB debugging
- authorizations
- Reconnect phone and tap Allow again
6. Virtual display opens as blank screen
- Cause: No launcher available in virtual display.
- Fix: Launch an app directly:
scrcpy –new-display=1920×1080 –start-app=com.google.android.dialer
7. Mouse not working inside scrcpy window
Cause: Input injection conflict on some devices.
scrcpy –mouse=aoa
8. Scrcpy fails to start on Meizu devices
- Cause: Known startup bug. Fixed in v3.3.4.
- Fix: Update to scrcpy v3.3.4 — the Meizu fix is included in this release.
How to Use Scrcpy Without USB Debugging
Yes, scrcpy works without USB debugging — in OTG mode only. OTG mode controls your phone using keyboard, mouse, and gamepad simulation. Screen mirroring is disabled in this mode.
Run OTG Mode
scrcpy –otg
A blank scrcpy window appears. Your keyboard and mouse now directly control the Android device.
What OTG Mode Can Do
- Control phone with keyboard and mouse without ADB
- Navigate to Developer Options and enable USB debugging
- Back up data after enabling USB debugging
- Works on any Android phone connected via USB
What OTG Mode Cannot Do
- No screen mirroring — the window shows only the scrcpy logo
- No audio forwarding
- Does not work over WiFi — USB cable required
Note: OTG mode is the solution for broken-screen phones where USB debugging was not previously enabled. Navigate blindly using Tab and Enter until you reach Developer Options.
Scrcpy vs Vysor vs AirDroid: Which Is Best?
Scrcpy is the best choice for most users in 2026. It is 100% free, has the lowest latency of the three, and supports features like virtual displays and audio forwarding that Vysor does not offer.
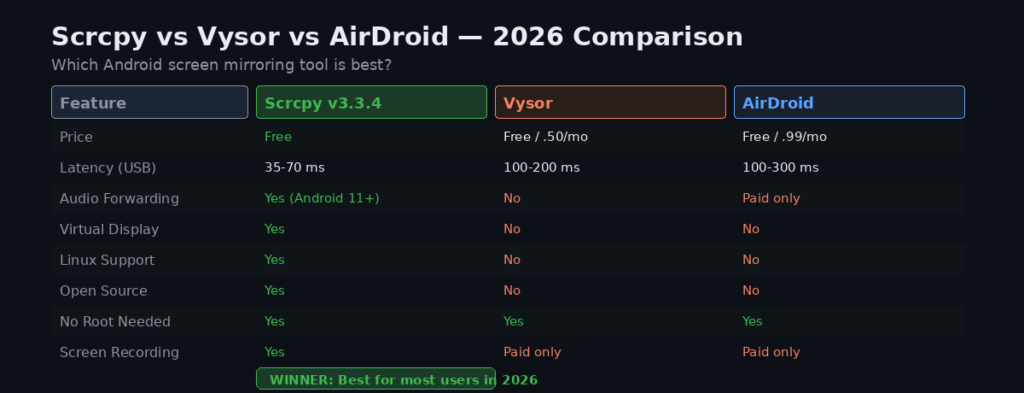
Scrcpy vs Vysor vs AirDroid — feature and price comparison 2026
| Feature | Scrcpy v3.3.4 | Vysor | AirDroid |
| Price | Free | Free / $2.50/mo Pro | Free / $3.99/mo |
| Latency (USB) | 35 to 70 ms | 100 to 200 ms | 100 to 300 ms |
| Audio forwarding | Yes (Android 11+) | No | Paid only |
| Virtual display | Yes (v3.0+) | No | No |
| Screen recording | Yes | Paid only | Paid only |
| Linux support | Yes | No | No |
| Open source | Yes | No | No |
| Wireless | Yes | Yes | Yes |
| No root needed | Yes | Yes | Yes |
- Choose Scrcpy: for zero cost, full features, and the lowest latency on all 3 platforms.
- Choose Vysor: for a simple graphical interface without any command line.
- Choose AirDroid: for remote file management and cross-device notifications.
Can scrcpy connect 2 phones at the same time?
Yes. Connect both phones, run adb devices to list them, then run 2 separate scrcpy instances:
* scrcpy –serial DEVICE_ID_1
* scrcpy –serial DEVICE_ID_2
How do I update scrcpy to the latest version?
- Windows: Download the new zip from GitHub and extract it over the old folder
- Mac: Run brew upgrade scrcpy in Terminal
- Linux Snap: Run sudo snap refresh scrcpy
- Linux tarball: Download and extract the new version from GitHub
Conclusion
Scrcpy v3.3.4 is the most capable free Android screen mirroring tool available in 2026. It runs on Windows, Mac, and Linux with no fees, no root, and nothing permanently installed on your phone. The 4 steps to get started right now, Enable USB debugging on your Android phone (tap Build number 7 times). Download scrcpy v3.3.4 from github.com/Genymobile/scrcpy/releases. Connect your phone via USB and run scrcpy in your terminal. Switch to wireless using adb tcpip 5555 once the USB connection works For best performance, use a USB 3.0 cable for wired connections. For wireless, use a 5 GHz WiFi network to keep latency under 150 ms.
Frequently Asked Questions